
If your Monday routine includes opening the same workbook and asking Copilot roughly the same question, scheduling that prompt sounds pretty appealing. Let the briefing get started while you get your coffee. Surely we can automate at least one of those things.
You can schedule requests on the main Microsoft 365 Copilot website, using an Excel workbook as a source when Copilot can actually read it. The scheduling steps in this post happen on that website, not inside Excel's Copilot Chat pane. I would treat the result as a low-stakes internal check-in: a first pass at what changed and what deserves a closer look while you open the workbook yourself.
This walkthrough produces a response in chat for you to review. It does not set up a refresh of your source data, create a Word report, or deliver a weekly email to your team. Let's build a small weekly sales example, test what Copilot can read, and then put this one useful tool in context alongside Power Query, Cowork and a fuller reporting workflow.
November 2026 rollout note. Microsoft is renaming Scheduled prompts to Scheduled tasks and moving management into Task Hub. The screenshots below show the main Copilot website as it appeared in my account on November 12, 2026; your account may still have the older Scheduled prompts menu. The older Power Platform schedules retire on December 31, 2026; recreate any that you want to keep as new scheduled tasks. See the current user guide and the migration guidance.
What you need before you start
Open the main Microsoft 365 Copilot website in your browser and sign in with your work account. This walkthrough schedules the review in that app, outside the Chat pane inside Excel. Excel holds the source workbook; the main Copilot app runs the scheduled request. Having a Copilot button in Excel does not, by itself, establish that your account has the scheduling entitlement.
| Requirement | What to check |
|---|---|
| An assigned Copilot license | Use a paid commercial Copilot entitlement. Eligible base plans include Microsoft 365 Business Basic, Standard and Premium, and Microsoft 365 E3/E5, with the appropriate Copilot add-on. Microsoft 365 E7 includes Copilot. Check Microsoft's current license options for your plan; a base subscription alone is not the add-on. |
| The right Copilot experience | Use Chat mode in the main Copilot app with Work IQ enabled. The web interface checked for this post has Tasks > Scheduled for Chat schedules. The separate Automations link manages Cowork schedules. |
| A stable cloud workbook | For this exercise, save the supplied .xlsx file in your own OneDrive for Business or SharePoint. Use an account that can access it, and keep that same source updated. There is no need to create a public sharing link. |
| A successful source check | Confirm that Copilot can read the table cells and reproduce the expected totals. Finding a file title or citing its link is not sufficient evidence. |
The new scheduler supports up to 10 active schedules and 50 total per user, and no longer needs a Power Platform environment. Legacy schedules have different connected-experience controls. These are rollout-specific details, so use the administrator documentation if your option is missing. Do not buy a separate Power Automate license just on the assumption that the new native Copilot scheduler requires one.
Start with the WeeklySales table
Download the practice files and open weekly-sales.xlsx. The fictional sales data is already saved as an Excel Table named WeeklySales, ready for this exercise. You do not need to create or rename a table. The ZIP also includes both prompts from this post and a short README.
You can also browse the standalone GitHub repository. Save your own working copy in OneDrive for Business or SharePoint before trying the chat prompts.
On the Weekly sales worksheet, the data source is the Excel Table named WeeklySales. It has six fields: WeekEnding, Region, SalesUSD, Orders, Status and Notes. Each row represents one region for one week ending on Sunday. Complete means that the weekly figures have been finalized.

Prove that Copilot can read the source
Switch from Excel to the main Copilot website and choose Chat. Select your cloud workbook through the available file picker or use its link in the prompt. Replace [WORKBOOK LINK] below with the link to your own copy. Start with fixed dates so you have a result you can check regardless of when you read this post.
Use only the Excel workbook at [WORKBOOK LINK]. Read the WeeklySales table on the Weekly sales sheet. This is fictional practice data. Compare the completed weeks ending November 8, 2026 and November 1, 2026. Show sales totals and row counts for both weeks, the dollar and percentage change, and a region-by-region comparison. Use the Notes column to identify follow-up questions; do not invent causes. Cite the workbook. If you cannot read its cells, say so and stop. Do not modify the workbook or send messages.| Check | Expected result |
|---|---|
| Week ending November 1, 2026 | 4 rows; $117,000 in sales |
| Week ending November 8, 2026 | 4 rows; $121,000 in sales |
| Week-over-week change | +$4,000; approximately +3.42% |
| Regional changes | North +$3,000; South -$2,000; East +$1,200; West +$1,800 |
During preparation of this example, Copilot could find the uploaded workbook's metadata but reported that it could not read its worksheet cells from the supplied link. It stopped instead of producing the requested figures. That is a useful test result: the source connection was not ready for scheduling. It is not evidence that every account or file-selection route will behave the same way.
If you get that result, check the selected file, account permissions and available file-grounding experience before continuing. Do not schedule a request that cannot pass the manual check. Attaching a local copy may help with a one-time analysis, but it does not demonstrate that future runs will read updates to the cloud workbook.
You can check the current week's total directly in Excel with a structured-reference formula. Enter this in an empty cell outside the table; the result should be 121000:
=SUMIFS(WeeklySales[SalesUSD],WeeklySales[WeekEnding],DATE(2026,11,8),WeeklySales[Status],"Complete")Make the reporting period explicit
Once the manual source check works, replace the fixed dates with a recurring rule. A schedule tells Copilot when to run. The prompt still needs to tell it which period to analyze. Otherwise, your Monday briefing can become a very punctual discussion of last month's data.
Use only the current workbook at [WORKBOOK LINK], the WeeklySales table on the Weekly sales sheet. Prepare a weekly sales briefing for my review. Use America/New_York to interpret dates. Find the most recent Sunday before today's date and compare that WeekEnding with the Sunday seven days earlier. Require exactly one Complete row for each of North, South, East and West in both weeks. If a week or region is missing, duplicated, incomplete, or unreadable, explain the problem and stop; do not substitute an older week. Report the two week-ending dates, each week's row count and sales total, the dollar and percentage change, and the regional changes. Use only the Notes column for explanations and distinguish notes from hypotheses. End with two follow-up questions. Cite the source workbook. Do not edit files or send messages.This version requires all four regions for both expected weeks. It also tells Copilot to stop when a week is missing instead of quietly choosing an older pair. The original sample contains only November 1 and November 8, 2026. On runs after November 15, it should flag missing data until you append the relevant completed weeks to WeeklySales.
The notes provide context to investigate. A row mentioning a store closure does not establish how much of a sales change the closure caused. Keep that distinction in your review, even if the generated explanation sounds very confident.
Schedule the review on the main Copilot website
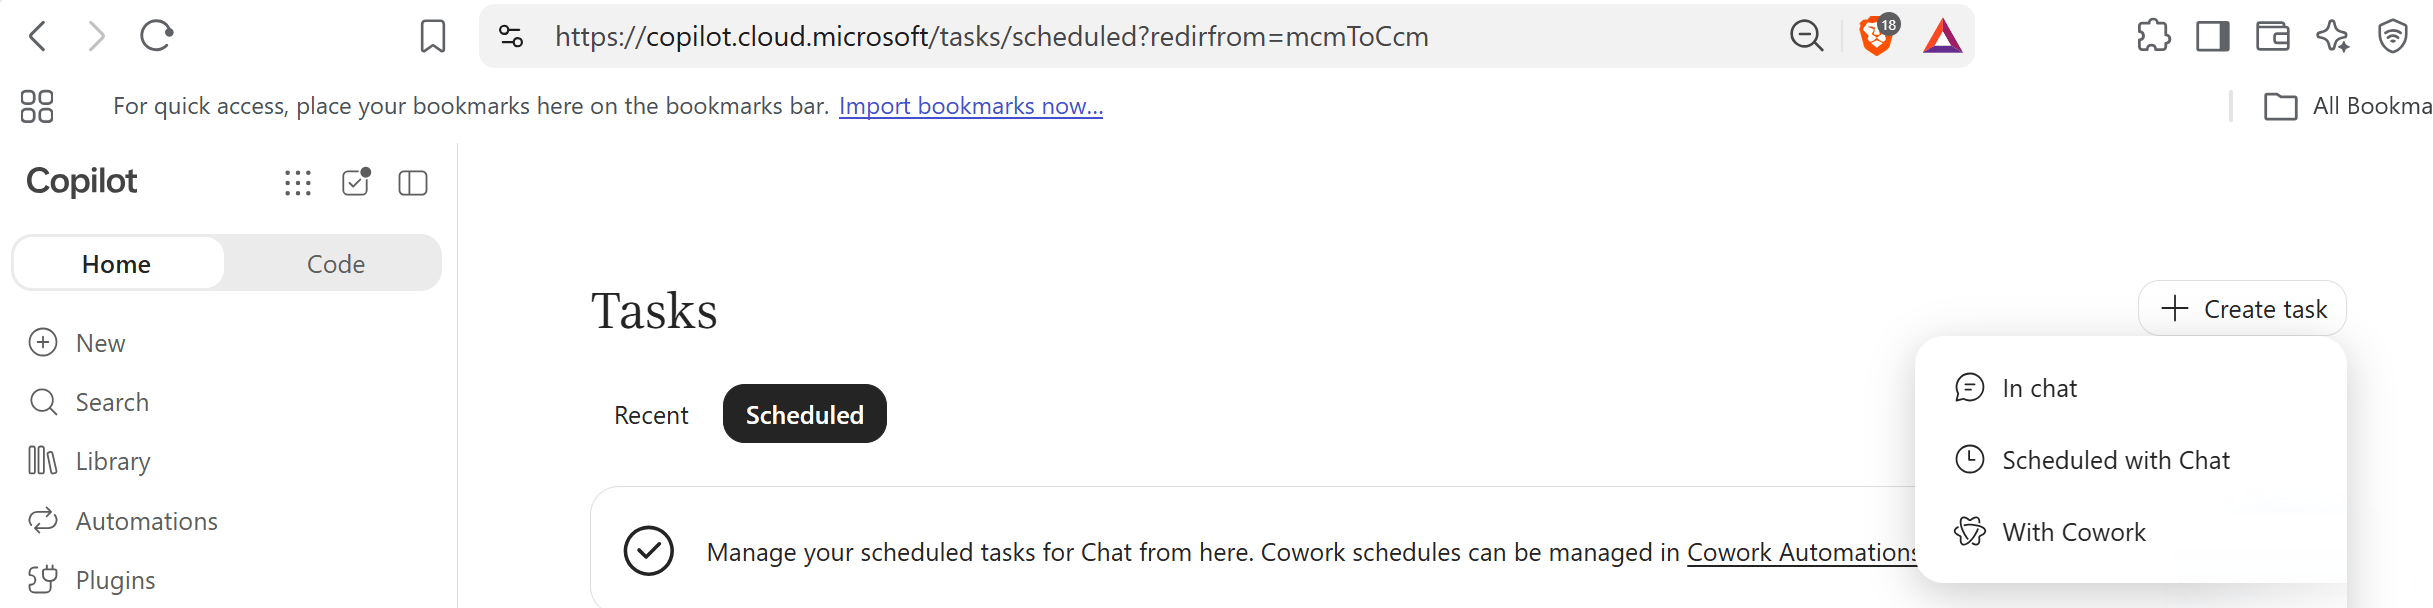
For this step, leave Excel and open the main Microsoft 365 Copilot website in your browser. We are not using the Copilot Chat pane inside Excel. The workbook supplies the data; the separate Copilot website is where we create and manage this scheduled Chat review. In my account, the address redirects to copilot.cloud.microsoft, as shown in the screenshot.
The route I verified on November 12, 2026 is Tasks > Scheduled > Create task > Scheduled with Chat. Click the small checklist-shaped Tasks icon near the Copilot logo at the upper left, select the Scheduled tab, and then open Create task. Choose Scheduled with Chat. The separate Automations link in the sidebar manages Cowork schedules.
This opens Create a schedule on the same website. Paste the complete, source-tested prompt above, with your actual workbook link in place of [WORKBOOK LINK]. Set Every to Week, select Monday, and choose a run time such as 9:00 a.m. Set a start date and an end date that suit your pilot. Check the displayed run time against your local time zone before saving; a time zone written in the prompt does not set the scheduler's clock.
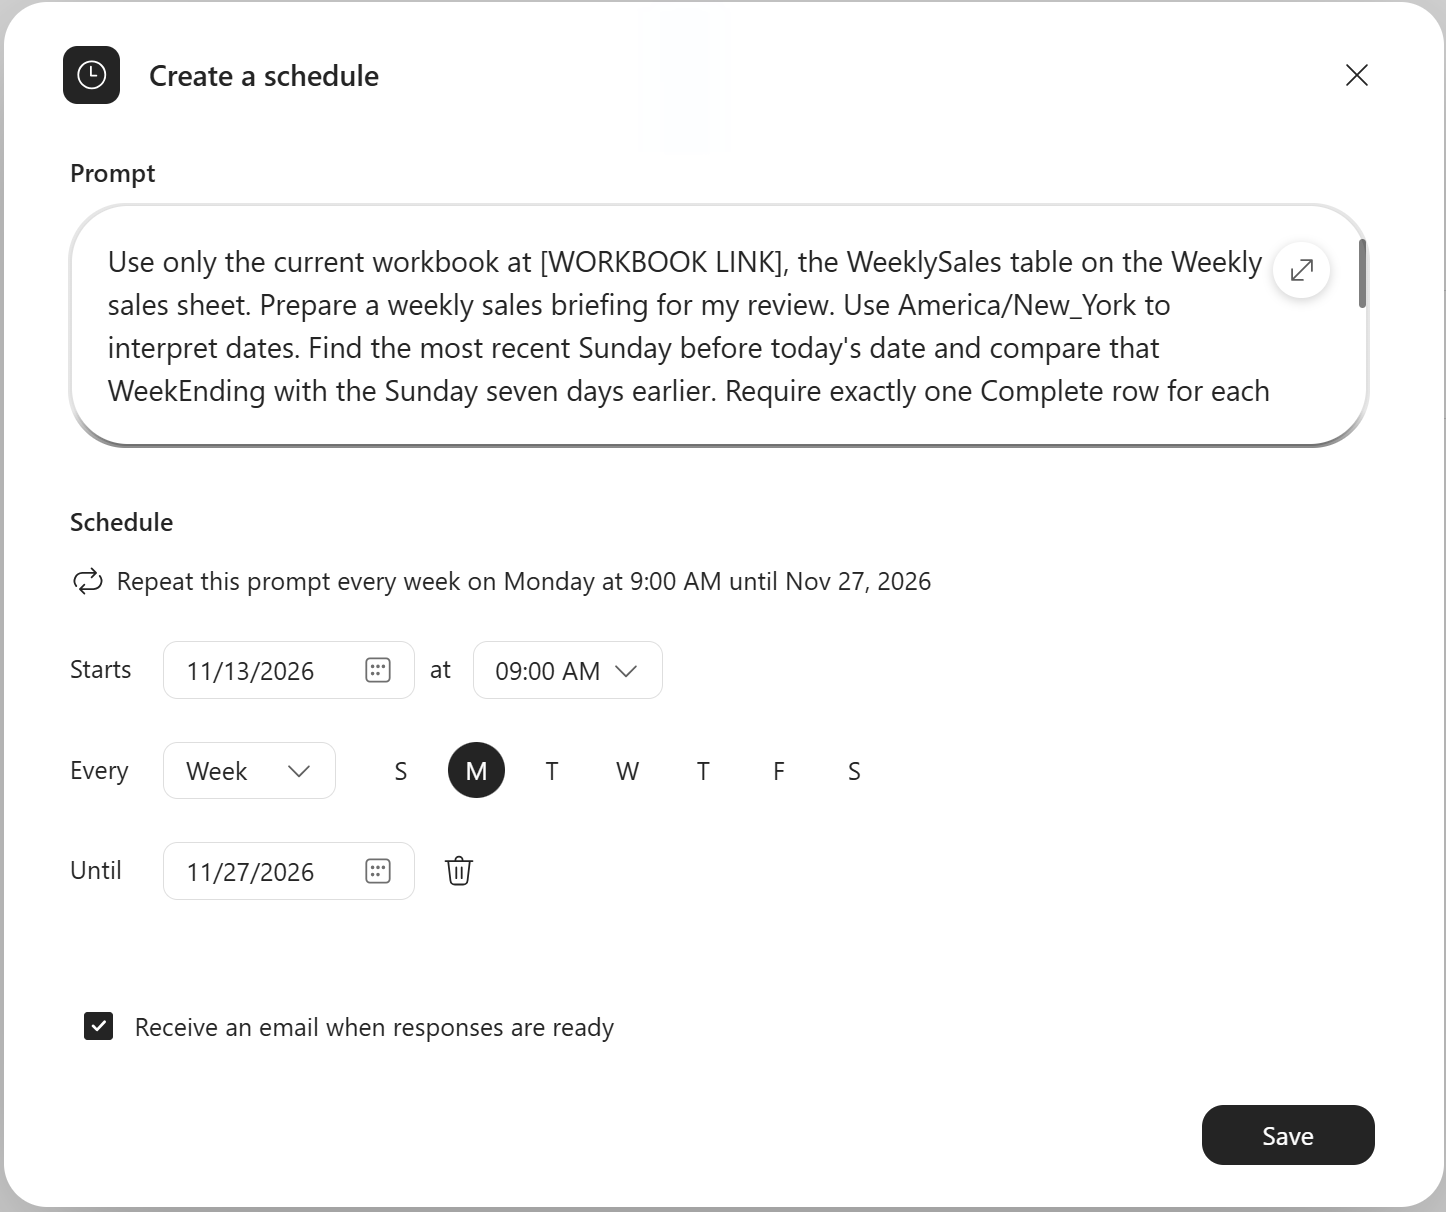
The Receive an email when responses are ready checkbox sends a notification to you. It does not turn this exercise into an emailed report for your team. Once you have checked the prompt, source access and timing, use Save to create your schedule.
If your main Copilot website still has the older layout, look under Settings and more > Scheduled prompts. Microsoft is moving these controls into Task Hub and also documents a Schedule this option on a prompt. Those menu variations should not send you hunting through Excel's ribbon or Chat pane for the controls shown here. If scheduling is missing from the website too, check your work account, Copilot entitlement and rollout against Microsoft's scheduling guide.
Choose a run time after the table is normally updated and finalized. For example, Monday at 9:00 a.m. only makes sense if all four regions have completed their Sunday figures by then. A calendar appointment cannot persuade a missing row to arrive early.
After a run, open the result in Copilot's Chats list and check its source, dates, row counts and totals. In the new Task Hub, the Scheduled tab provides Run now, Edit Schedule, Pause and Delete. For an initial pilot, use a disposable workbook copy and change a known value between runs so you can verify that later results reflect the updated source. Pause the schedule when the pilot ends.
At this point, you have a recurring starting point for your own review. The checks in the prompt are instructions to an AI model, so you still need to verify the answer against Excel. I would use this to notice a change or prepare follow-up questions, rather than treat the chat response as an approved report.
For weekly data cleaning, start with Power Query
If the recurring job is importing exports, fixing dates, combining files and joining reference data, Power Query is the tool I would reach for first. You build and review the preparation steps once, then refresh them against the next compatible set of data. For our sales example, that could mean combining the regional exports into the table before anyone asks Copilot what changed. My Get Data and Power Query article shows how Copilot can help build that reusable process. The saved query is what does the recurring cleanup.
There is an awkward gap to plan around: you cannot currently use an Office Script run by a Power Automate cloud flow to refresh ordinary Power Query connections in an Excel workbook. Microsoft documents that refreshAllDataConnections() only refreshes Power BI sources in that context; other sources can report success without refreshing. See the documented refresh limitations. For a small weekly process, you might refresh in Excel, confirm the new data and save before the reporting step. Fully unattended preparation needs its own supported refresh arrangement, such as an upstream dataflow with scheduled refresh and a way to pass its fresh output to the report. Refreshing that dataflow does not refresh an Excel connection to it.
When you need a Word briefing or an email draft
The scheduled review in this post ends in Copilot Chat. You can ask for email-style wording there and copy it, but that is different from creating an Outlook draft or putting a briefing into a Word document. An email notification that a response is ready is also different from emailing the report to your team. Microsoft is bringing Chat, Cowork and scheduled tasks closer together. This describes our example; newer tasks may offer additional actions depending on your account.
For an assignment that includes actual files and communications, Microsoft Copilot Cowork is worth considering. Its Word and Email skills can create documents and save email drafts, with approval controls for sending. In my Cowork walkthrough for finance teams, I used it to prepare an Excel review workbook and a matching Word briefing. That is closer to handing over a small reporting assignment. You still review the files and reconcile the figures; Cowork does not make those checks unnecessary.
What a fuller reporting process could look like
When people depend on receiving a report every week, I would consider Power Automate, prompt builder and Office Scripts as parts of a more controlled process. Each has a specific job, and you do not need to build all of this to try the scheduled prompt above:
- Prepare fresh data. Run the saved Power Query steps through a supported refresh route, then confirm the expected week and source files are present. Only continue once that preparation has finished.
- Check and calculate. Use reviewed Excel formulas or Office Script logic for totals, row counts, missing regions and duplicate checks. Reconcile the prepared data to the source, and stop the process if a required check fails.
- Draft the explanation. Use a prompt built in prompt builder through Power Automate's Run a prompt action. Give it the checked figures and relevant notes, and compare any numbers it returns with the calculated results.
- Review and distribute. Have the flow populate a Word template or prepare an email, route it for review, and send or save the approved version. Keep a dated output and run history; send a failure notice to the owner when the checks do not pass.
My walkthrough on validating AI-generated Excel reports with Office Scripts puts Power Automate, a custom prompt and an independent Excel total together: the flow compares the figures before allowing the report to move forward. Check the licenses and usage capacity for your chosen connectors and AI actions before building. Matching one total is a checkpoint, though; the reporting period, source completeness and written explanation still need their own checks.
For now, try one small internal review that helps you decide where to look next. A scheduled prompt can kickstart that work while the coffee is brewing. The data preparation, reliable calculations and delivery process still need a home of their own.
Related walkthroughs

Excel AI workflows versus agents
Clarify the difference before deciding how much autonomy your reporting process needs.

Get started with Power Automate for Excel
Build flows around the routine Excel work you repeat each week.

Validate AI-generated reports with Office Scripts
Add concrete checks so incorrect numbers are caught before a report is shared.
Keep building your Excel and Copilot skills
My LinkedIn Learning course, Excel with Copilot: AI-Driven Data Analysis, is fully unlocked: the entire course is free, and no account is required.
For your team, I offer practical Microsoft 365 Copilot training that connects useful prompts with sound Excel habits and repeatable reporting workflows.