Power Automate offers Excel users exciting new ways to build workflows among various applications, including automating report distribution and automatically updating workbooks based on updates from external data sources.
Although it features a relatively user-friendly GUI, setting up the perfect workflow still requires some engineering finesse due to the platform’s complexity and variety of options.
Fortunately, the introduction of Copilot has significantly simplified these processes. Let’s explore how in this blog post.
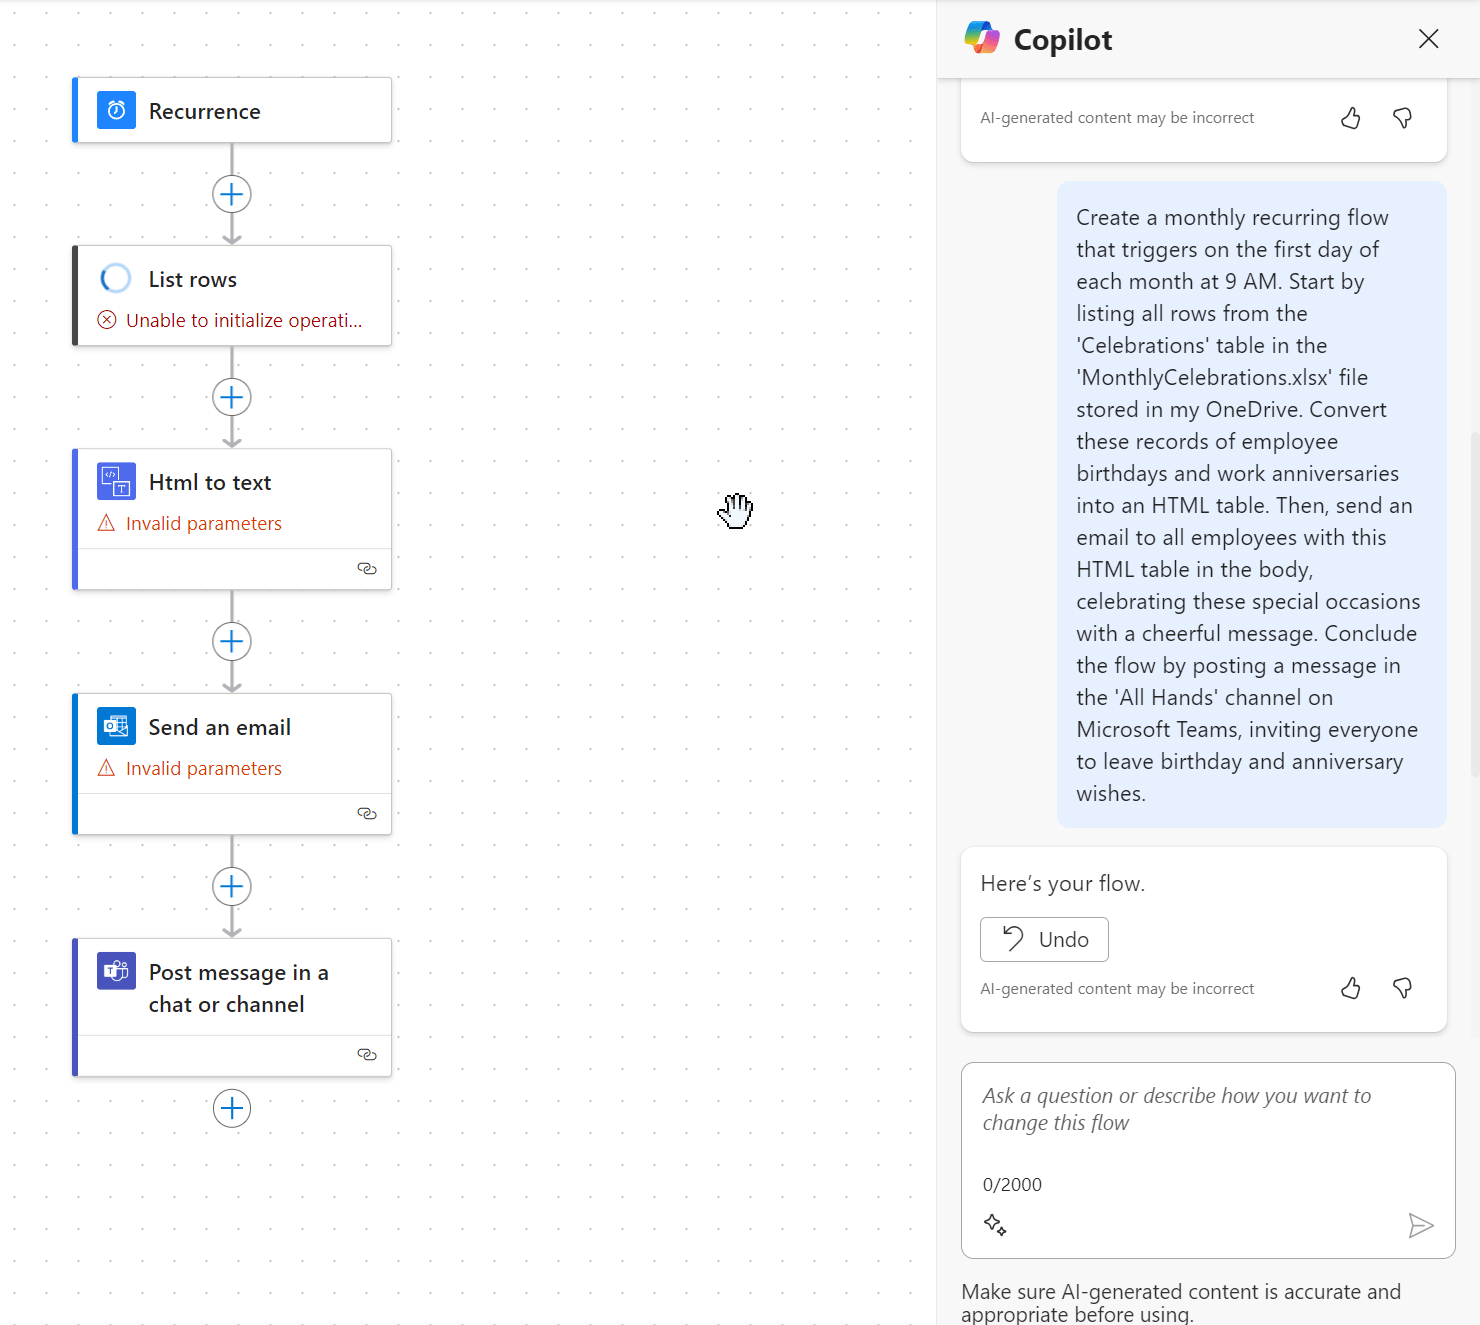
To begin, navigate to make.powerautomate.com. Right at the top, you’ll find a text box where you can describe your automation workflow. Copilot will then leverage AI to draft a preliminary version for you.
Before we proceed, a word of caution: Power Automate is currently a very dynamic tool, and results can vary greatly. The examples I’ll show here may differ significantly from what you might experience, and could even vary if I were to run them again. With that in mind, feel free to take the somewhat complex prompt below, enter it into Copilot, and hit Generate:
Create a monthly recurring flow that triggers on the first day of each month at 9 AM. Start by listing all rows from the ‘Celebrations’ table in the ‘MonthlyCelebrations.xlsx’ file stored in my OneDrive. Convert these records of employee birthdays and work anniversaries into an HTML table. Then, send an email to all employees with this HTML table in the body, celebrating these special occasions with a cheerful message. Conclude the flow by posting a message in the ‘All Hands’ channel on Microsoft Teams, inviting everyone to leave birthday and anniversary wishes.

Keep in mind, this is a fairly complex script. Copilot might struggle with it. If that happens, I’ve found success by creating a blank scheduled cloud flow and then entering this prompt into the Copilot box that appears within the flow, like so:

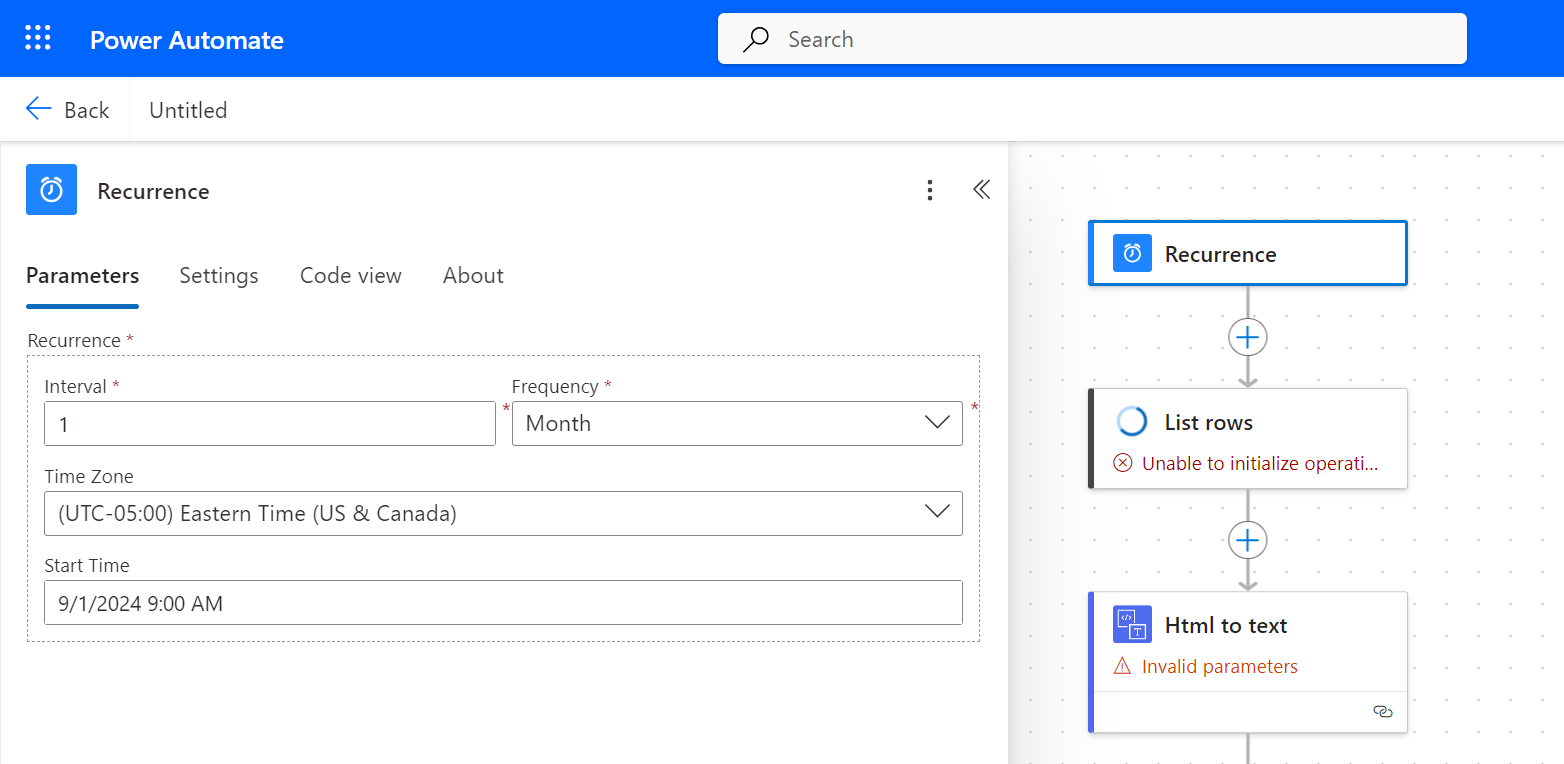
You should now see various steps in the flow, each set up to different degrees. Let’s start from the top and work our way down, beginning with the Recurrence. Click on it to fine-tune the settings. In my case, Copilot correctly set the interval to once a month, but it didn’t specify when to run the flow.
I’ll add additional context, such as the time zone and the start time. Keep in mind that this means the email will always be sent out on the first, even if it falls on a weekend or holiday. For the sake of simplicity, we’re fine with that. Your Recurrence settings in the flow should now look something like this:

The next step involves listing all the rows in the Excel workbook. In my case, Copilot didn’t quite return the correct step. So, I’m going to click on it, remove the “List rows” step, and replace it with the Excel-specific option that reads “List rows present in a table.”
Next, you need to connect this to a source Excel table! Use the file linked below. Upload it to your OneDrive, and then navigate to it in Power Automate like this.

For the next step, we’ll convert the data from this Excel table into HTML, which will be used in subsequent flows. This step requires a bit of effort. First, the correct connector here is “Create HTML Table,” which my Copilot didn’t quite identify.
Next, set up custom parameters to map the results of the Excel table to the HTML table. Ensure you select ‘body/value’ under “From.” You can click on the lightning bolt icon in the text box to access this.
Then, you’ll need to map each Excel column to a corresponding column in the HTML table. To do this, click on “Columns” under Advanced Parameters, and from the dropdown under Columns, choose Custom. You should set up the table with columns for Name, Date, and Occasion. Name and Occasion will map directly from the previous steps in Excel.

For the Date, you will need to convert Excel’s serial number format into a standard date format that HTML can render correctly. We’ll use the following Power Fx function to achieve this:
For a basic introduction to the Power Fx programming language and guidance on how to incorporate functions into your Power Automate workflows, check out this post:
Next, let’s configure the email settings! This email will be sent from the email account linked to the flow, but you can adjust this in the flow’s settings at the bottom. I’ll specify the recipients for this email, which can include individual names, groups, etc.
Here, you will also add the subject line and craft the body of the email. Ensure you include the dynamic Output content from the previous “Create HTML Table” step so it appears in the email.

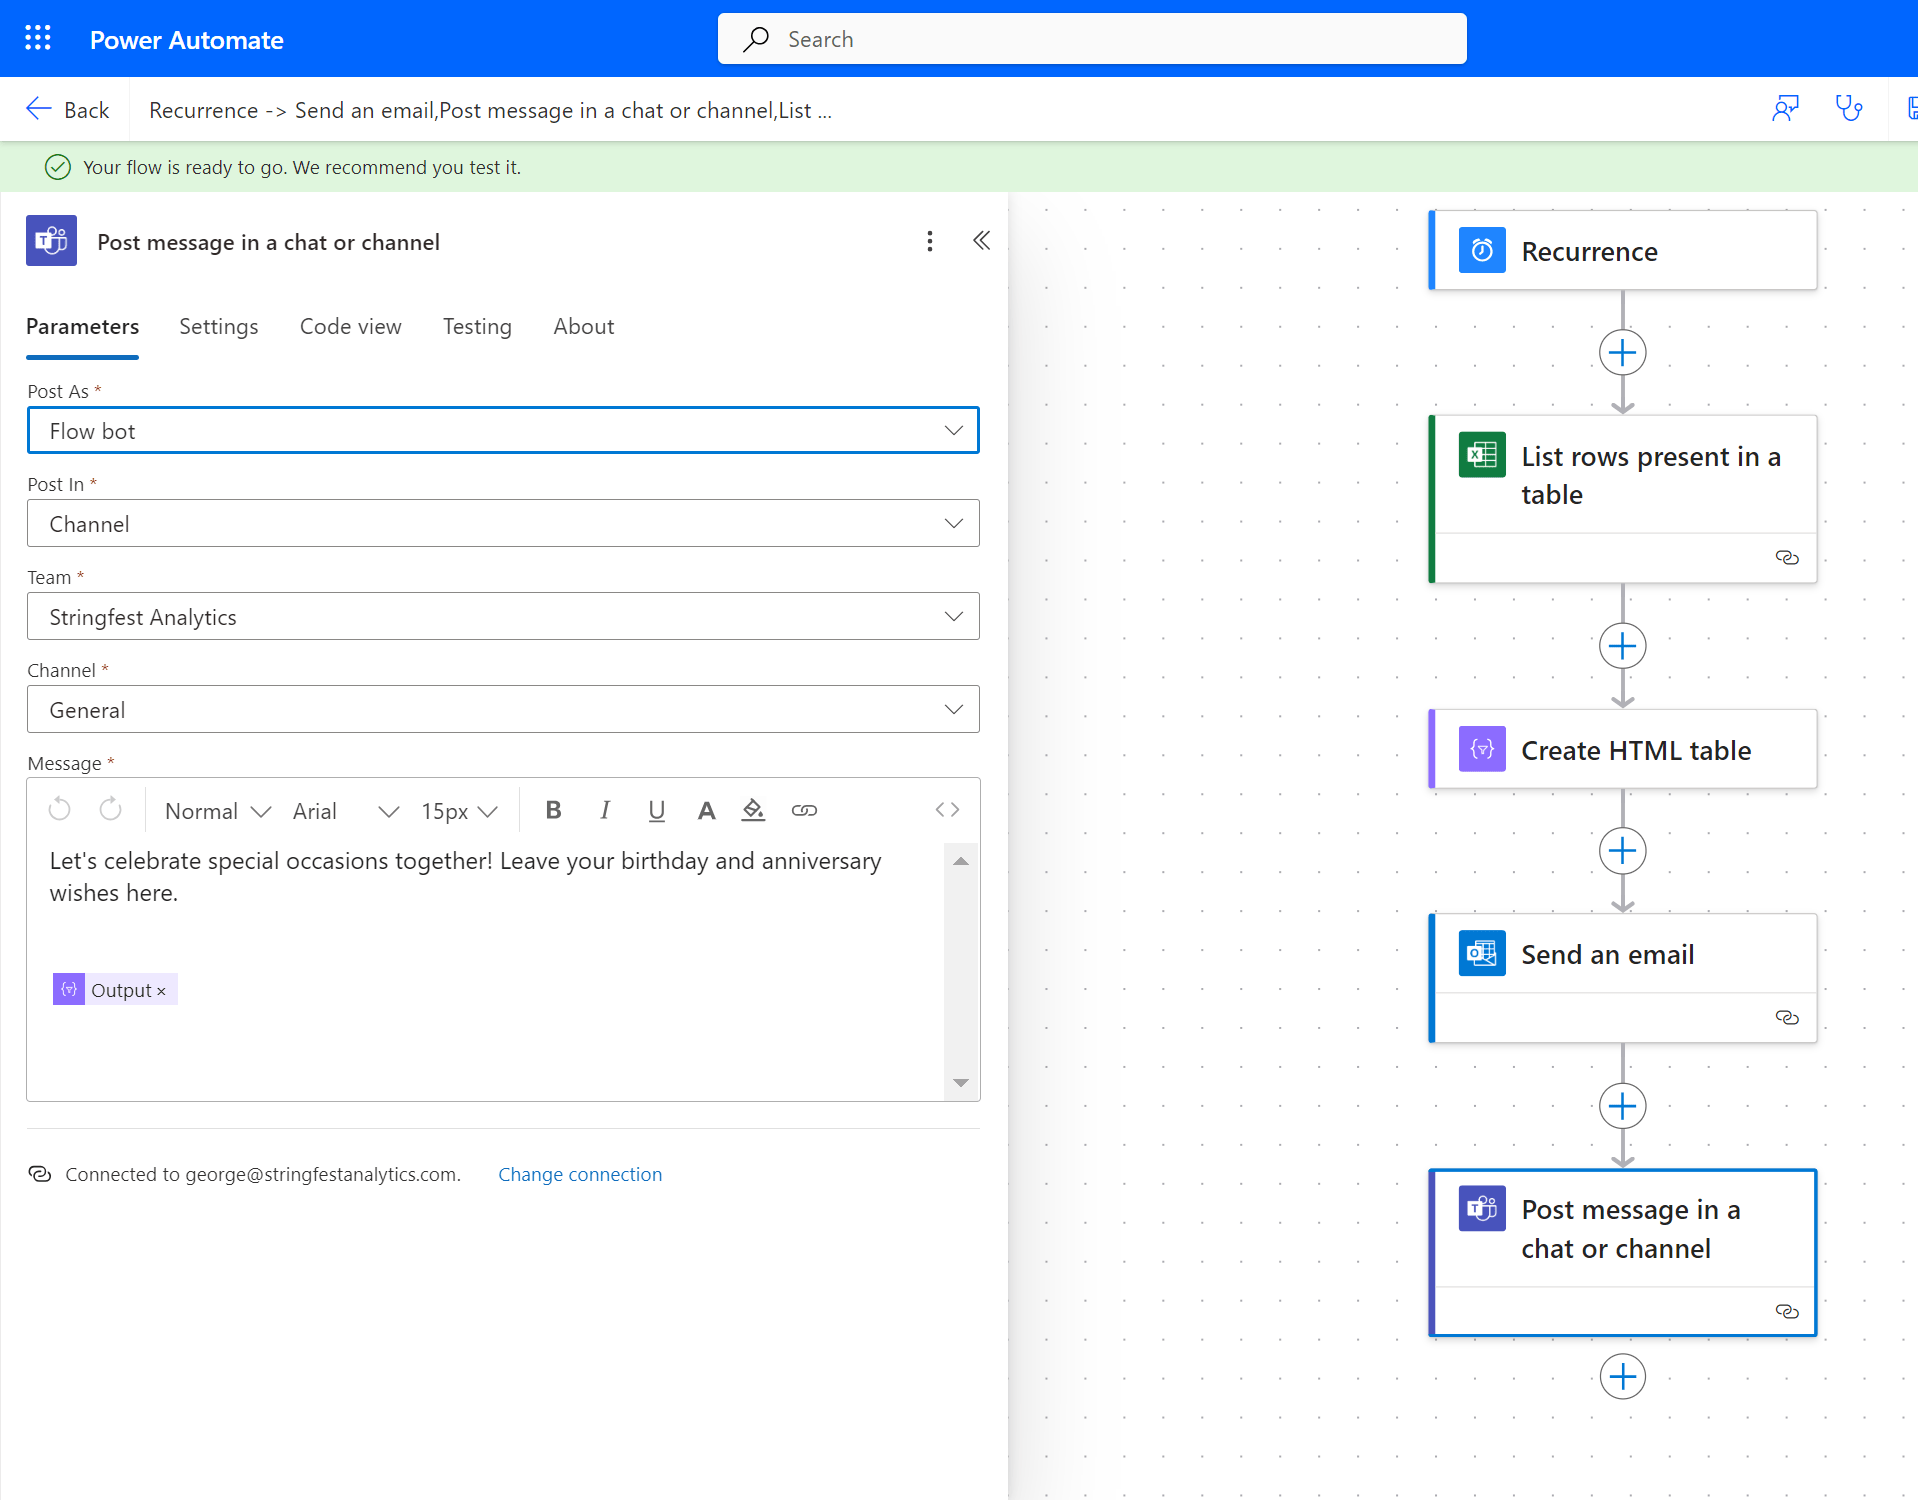
Last but not least, we’ll do something similar by posting a message to a specified Teams channel. Copilot managed to identify the correct flow step but didn’t configure the parameters accurately. This isn’t too surprising, as there isn’t an “All Hands” channel in my account, which is what I initially requested.

Fantastic! Now, as a final step, save and test the flow — you don’t need to wait until the 1st of the month to check if it works! If everything is set up correctly, you should soon see an email and a Teams post that look like this:


In conclusion, Copilot excels at creating the initial framework, though you’ll likely need to refine it further to perfect your setup. It definitely saves time, but there’s room to enhance the flow, such as by dynamically filtering dates each month for seamless monthly updates. However, we’ll start with what we have for now—every journey begins with a single step!
Do you have any questions about using Copilot with Power Automate, or about automating tasks across your organization with Power Automate and Excel? Share your inquiries in the comments below.
