As an Excel user, you likely engage in routine workflows week after week. Perhaps you need to consolidate files from a specific email into a folder each week, create approval workflows for budgets and expense reports tracked in Excel, or integrate Excel with task management tools like Microsoft Planner or Trello to update tasks based on changes within your spreadsheets.
In the past, orchestrating Excel to automate interactions with external tools was challenging, relying on tools like VBA or the Windows Task Scheduler. Power Automate represents a significant leap forward in task automation for Excel users, surpassing these older methods.
As a cloud-based, low-code/no-code platform, Power Automate enables seamless integration with a broad range of cloud services and applications, making it accessible even to users without technical backgrounds. This post serves as an introduction to help you create your very first Power Automate flow for Excel, right from Excel.
To follow along, please download the exercise file linked below and ensure it’s uploaded to a location in OneDrive or SharePoint. Note that to follow along with these exercises, you must possess a business license for Microsoft 365.
Power Automate and Office Scripts
Many Power Automate workflows for Excel incorporate Office Scripts, which automate repetitive tasks within the workbook. To learn more about the relationship between Office Scripts and Power Automate, check out this post:
To set up our Power Automate example, we’ll first create an Office Script. Let’s build the script now. Navigate to the Automate tab on the ribbon and select New Script:

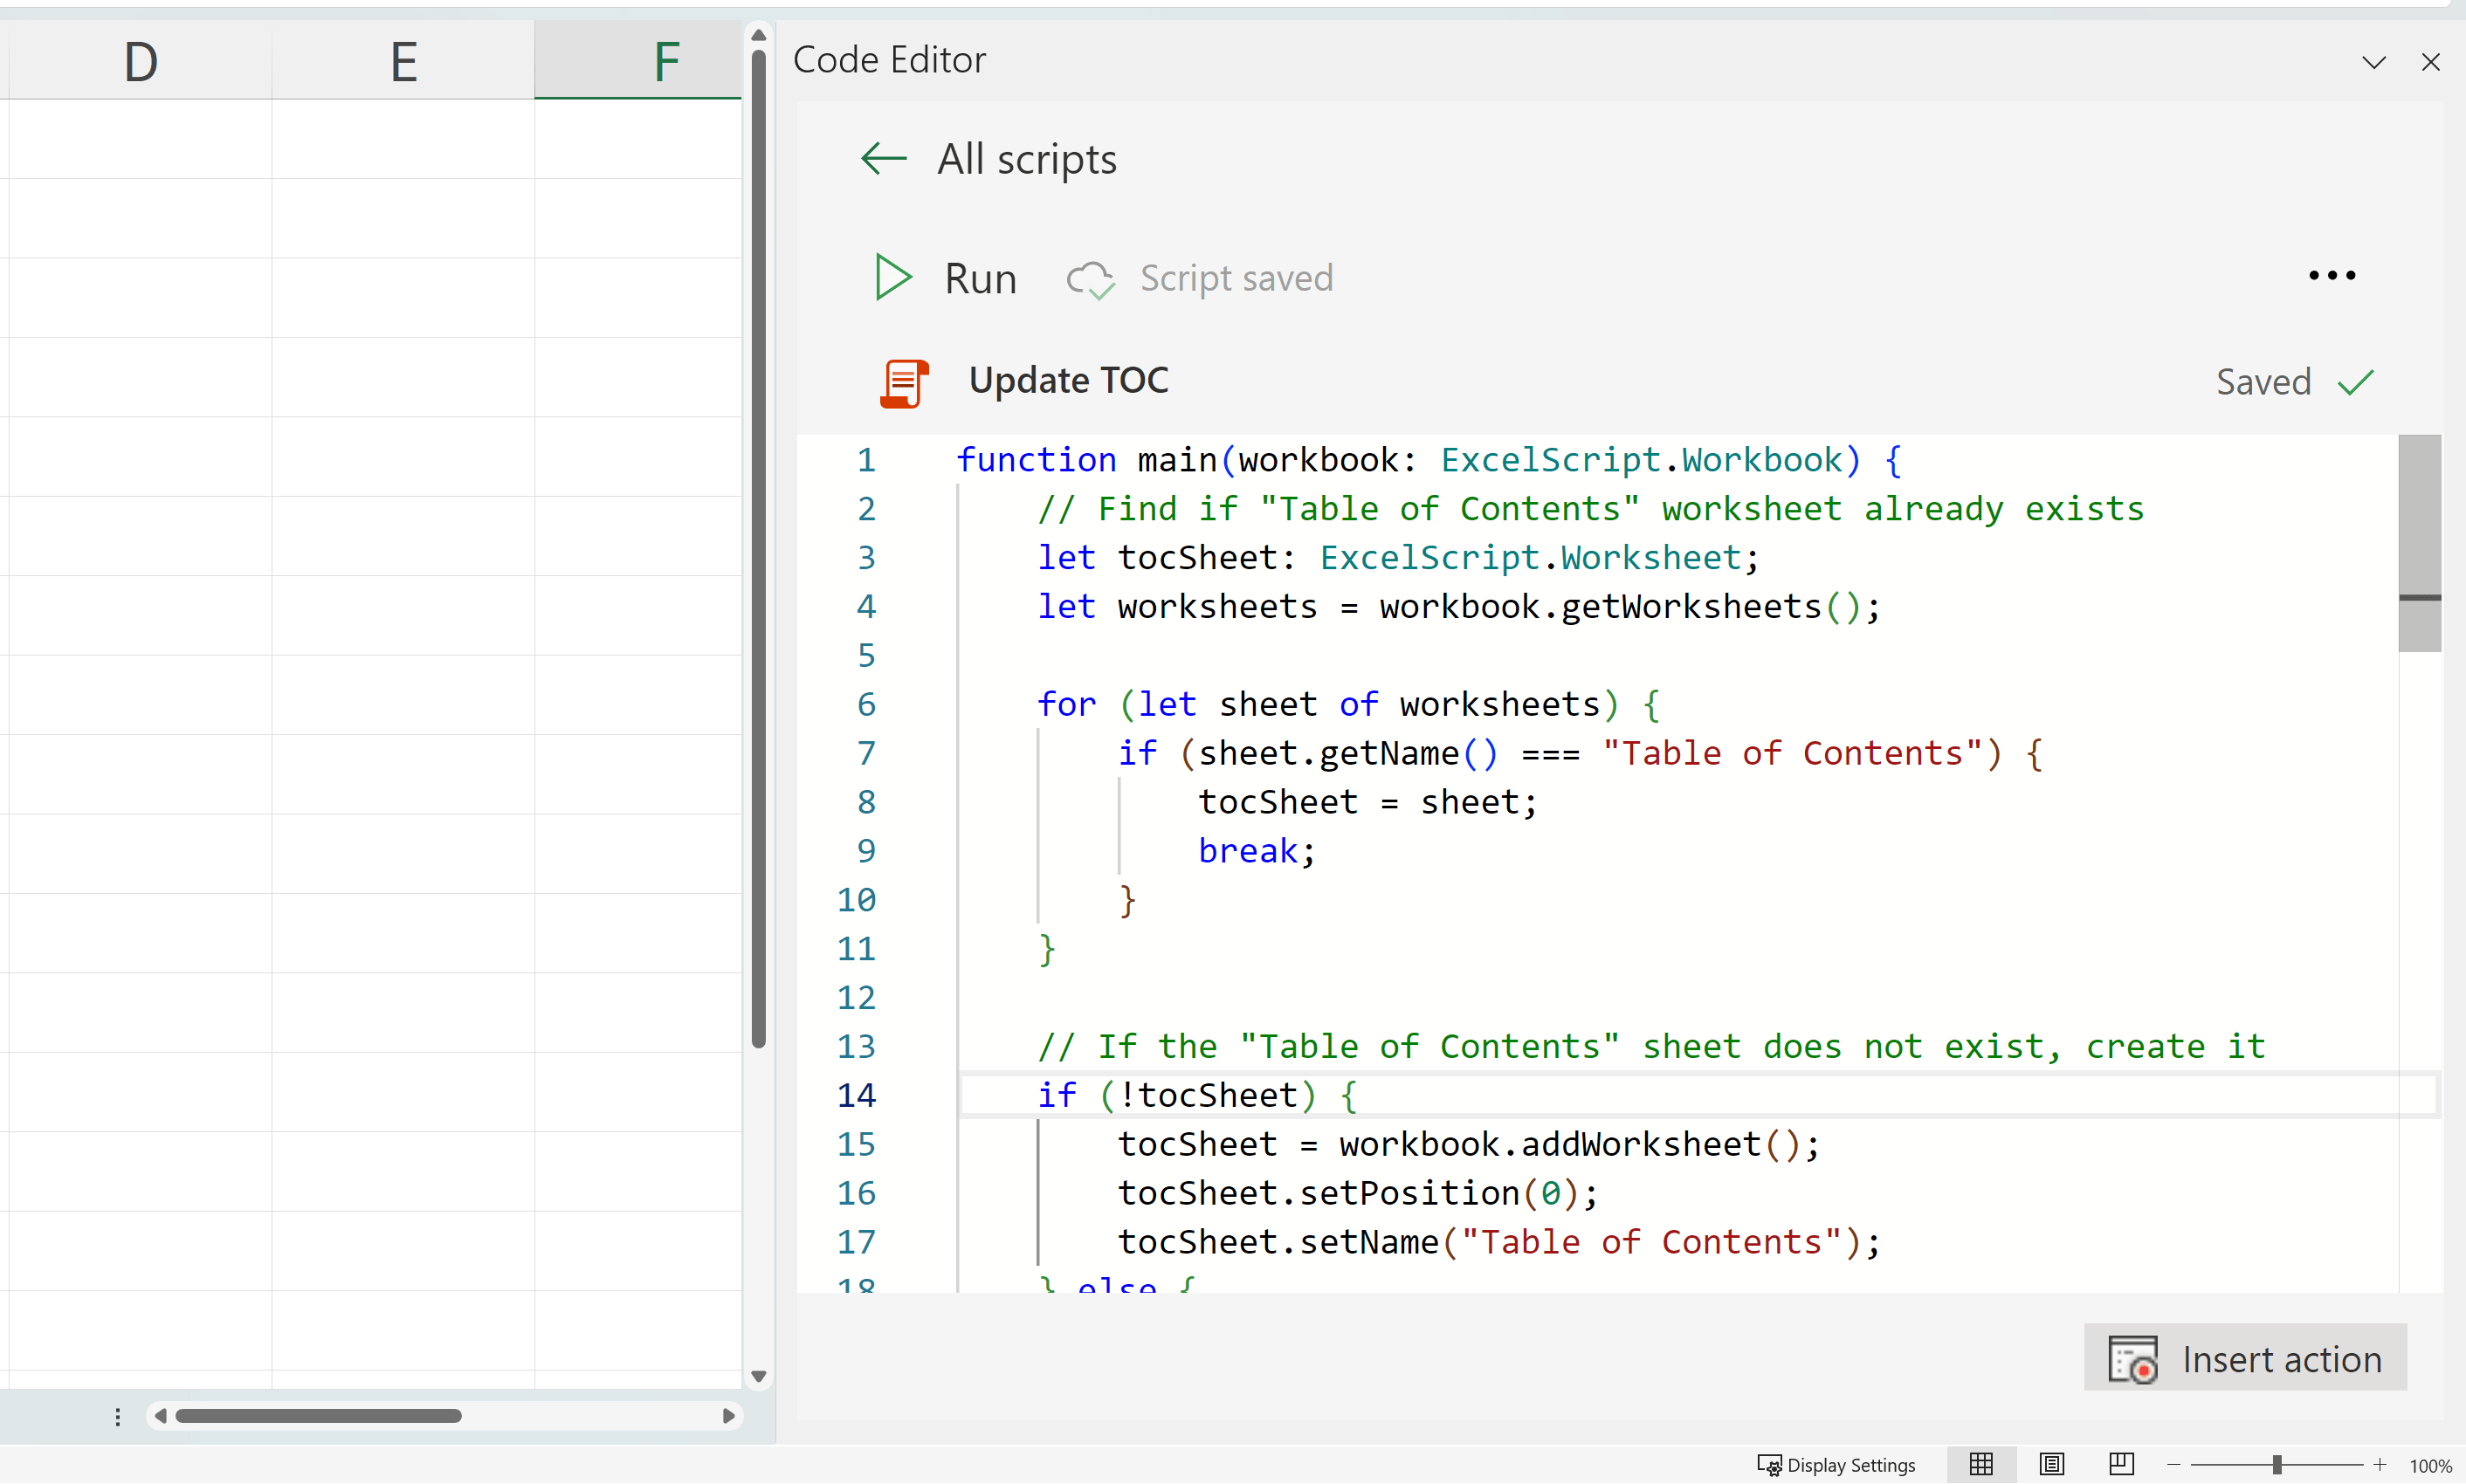
A sample Office Script and a code editor should appear on the side of your workbook. Go ahead and replace the sample code with the code provided below:
Don’t worry about understanding every detail of this code right now; you’ll have time to familiarize yourself with it later. However, it’s important to give this script a meaningful name to ensure it can be easily identified and used correctly. Let’s name it something descriptive, like “Update TOC.” As suggested by the name, the script’s purpose is to locate a table of contents worksheet in a workbook and update it if it exists, or create one from scratch if it doesn’t.

Great! With our script ready for later use, head back to the Automate tab and select the “Automate Work” button:

Once you click this button, you’ll see some basic workflows that have been pre-packaged into templates by Power Automate, which you can build directly from your Excel workbook. I am going to select the option to schedule an Office Script to run in Excel.

As the name suggests, this will set our script to run on a schedule in a given workbook. While it’s possible to run these scripts on demand, using this option allows us to schedule it to run, for example, every morning before we start working.
When you click on that button, you’ll have the option to name this flow and ensure that you are signed into the correct account. I’ll name my flow “Update TOC.”

Next, let’s set this up to run at 7:30 AM every day before the workday begins. Concerned it won’t run if your PC isn’t turned on at that time? No need to worry. This flow runs in the cloud, updating the OneDrive file online, ensuring the results are available on any local device.
Finally, specify the script you want to run, which in this case is “Update TOC:”

When you are done, click on “Create flow.” Nice work! Your flow has been created and is now available to run in this workbook. Feel free to run it now by clicking the ellipsis next to “Update TOC” and selecting “Run.”
Keep in mind, this flow is set to run every day at 7:30 AM. If you try to run it outside of this time and nothing happens, that’s likely the reason.

Fortunately, there is a workaround for testing the flow, so you don’t have to wait for the designated time to run it. This involves stepping out of Excel and into Power Automate itself, which is where these scripts truly “live.” To do that, click the ellipsis and choose “Edit in Power Automate.”
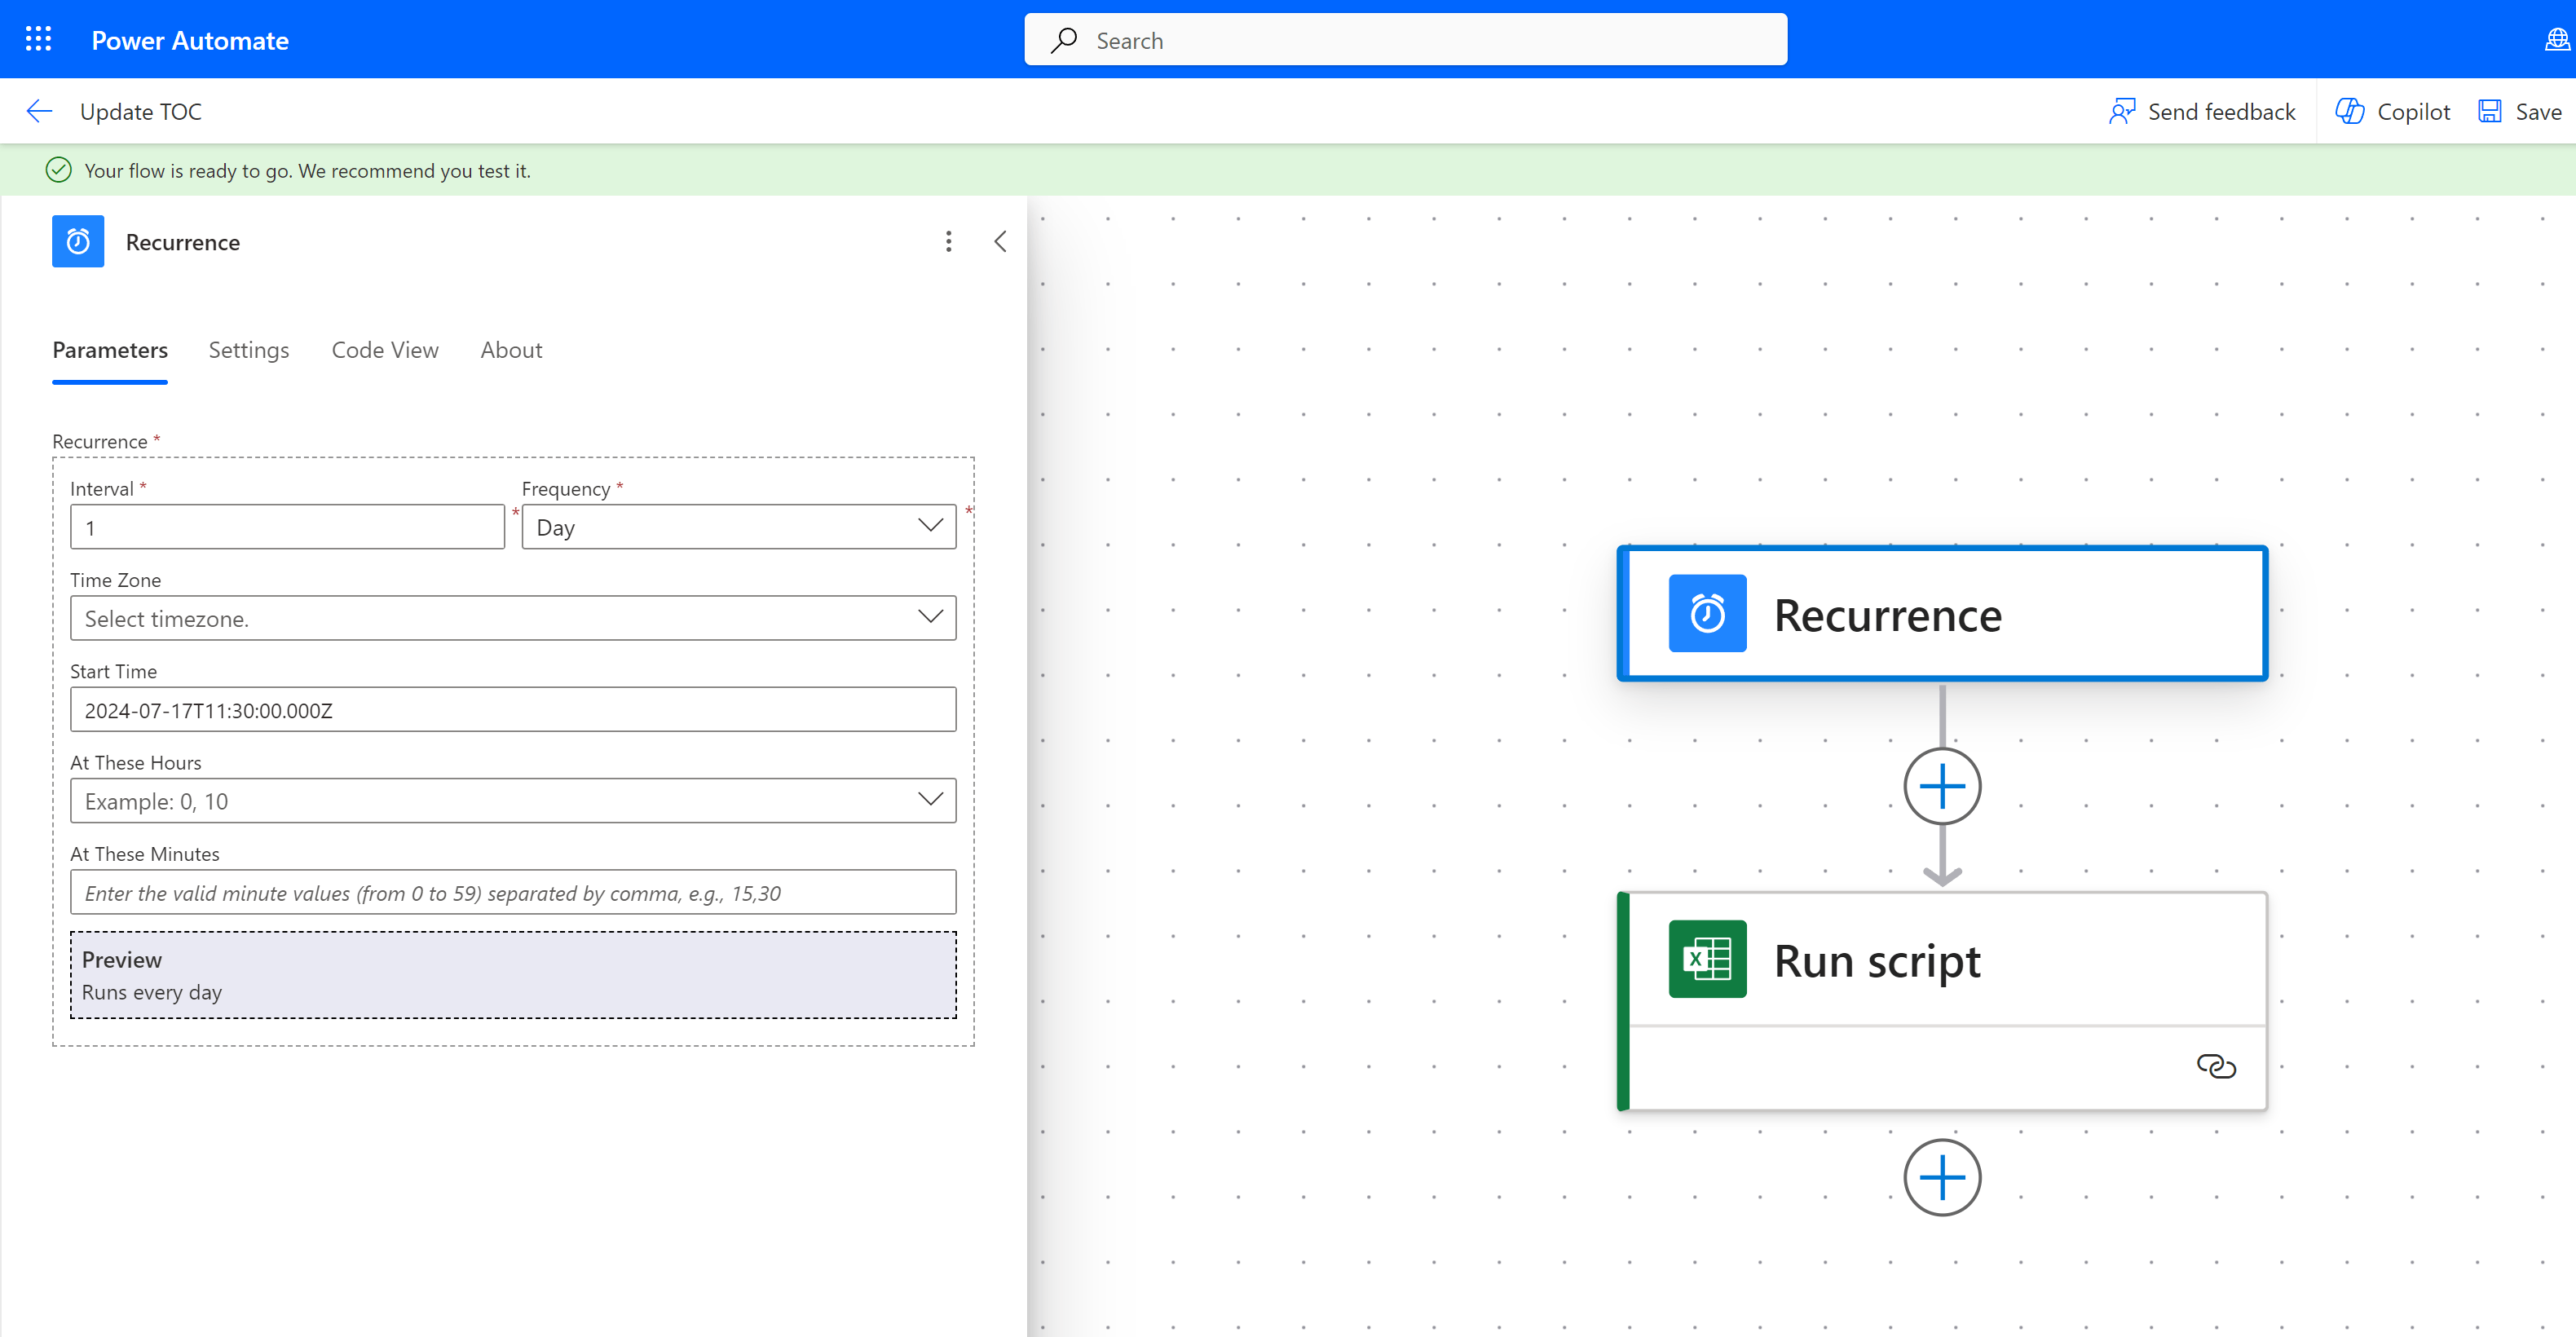
A new window will pop up, showing a visual diagram of the flow. Here, you have the opportunity to test it:

Click “Test,” then select “Manually” as the trigger to start the flow, and finally click “Run flow.” Power Automate will inform you that the flow run has successfully started.
If you want to monitor and validate the results, you can check the Flow Runs Page to view the log of this script.

Here are the results of my run history. You’ll see that I’ve tried running this script a few times, and each time it has been successful.

For further validation, you can return to the original Excel workbook and see for yourself that the table of contents has been added.

Feel free to add worksheets, change names, or even delete the TOC worksheet altogether and re-test it. This is a good practice to adopt, as it allows you to thoroughly test your scripts before automating them. It’s better to catch any issues now.
If, for some reason, the script itself isn’t behaving the way you want it to, you can edit it in Excel. But what if the actual flow isn’t working exactly how you want? For example, maybe you’d rather have it run twice a day or update a different workbook location altogether.
In such cases, instead of updating the script that gets run, you want to update the flow itself. This is done in the Power Automate editor. First, click “Recurrence” in the Power Automate diagram to see how this part of the flow is currently set up. You will see the parameters of this step appear to the left of the diagram.

Here, you have the opportunity to change the start time, interval, and other settings. While you had the chance to do this in Excel, this is really where the script “lives.”
Similarly, if you want to specify which script is run and in which workbook, you can select “Run script” in the Power Automate editor.

As you’re starting to see, most of the real “heavy lifting” of Power Automate for Excel isn’t going to be done in Excel itself but in Power Automate, as it is a much broader tool that integrates with many other programs besides Excel. The Power Automate template page in Excel is an interesting place to start and gain a basic understanding of how this tool works, but it is not the best long-term place to monitor, edit, and grow your workflows.
Once you begin working directly with the Power Automate editor, you’ll be able to add different triggers (perhaps you want this script to run for any file added to a SharePoint library), conditions (maybe you want a second script to run, but only if the file matches certain conditions), and much more. The combinations are as powerful as they are endless.
I hope this post has given you an understanding of what Power Automate is all about, how it relates to Office Scripts, and how to get started using these tools in Excel. What questions do you have about getting started with these exciting new tools? Let me know in the comments.
