
If you want to make your Excel data more useful across the Power Platform, connecting it to Dataflows within Power Apps is the right starting point. By moving data from your workbook into a Dataflow, you make it accessible to Dataverse and ready for automation through tools like Power Automate and Copilot Studio.
Once this connection is in place, you can start running prompts or reports on a schedule; for example, automatically generating a weekly variance report and posting it to Teams or emailing it. You could also build guardrails into your flows, such as approval steps or editable review stages, so your team can validate AI-generated insights before they’re published.
In this post we’ll connect a sales data table so that the data flows into Dataverse through Dataflows. I know that in the real world your sales data probably doesn’t live in Excel, or at least I hope it doesn’t. Excel often isn’t the best place for a single source of truth. But I also live in the real world, and I know that Excel has its advantages for powering those sources of truth. So here’s how to bridge that gap into a more developer and enterprise friendly way of doing things.
Save this workbook somewhere easy to find on your OneDrive or SharePoint. You’ll need it there for the next steps.
What is a Dataflow?
A Dataflow is a cloud-based way to extract, clean, and load data into the Power Platform. Power Apps will be our way in to set up these Dataflows, since that is where you can create and manage them to feed data into Dataverse. Dataflows use the same Power Query technology that Excel users already know, but instead of saving transformations inside a single workbook, they are stored in the cloud so multiple apps and services can reuse the same prepared dataset.
Once a Dataflow loads data into Dataverse, it becomes accessible across the Power Platform, including Power Apps for building interactive applications, Power Automate for scheduling and running flows, and Copilot Studio for creating generative AI experiences that draw on your Dataverse data.
A comparison table of using Power Query in Excel versus Dataflows in Power Apps follows.
| Feature | Power Query in Excel | Dataflows in Power Apps |
|---|---|---|
| Where it runs | On your computer | In the Power Platform cloud |
| Purpose | Transform data for a single workbook | Prepare and share data for multiple apps |
| Storage | Inside the Excel file | In Dataverse or Azure Data Lake |
| Refresh | Manual or workbook-triggered | Scheduled automatic refresh |
| Collaboration | Local to one user | Centralized and reusable across apps |
| Integration | Excel only | Connects to Power Apps, Power Automate, and Copilot Studio |
Syncing the Excel data to Dataflows
To get started, go to make.powerapps.com and head to Tables. These data sources are actually Dataverse tables. You’ll notice that many of them are already there by default. You didn’t create them, and you can safely ignore them for now. Dataverse includes a set of standard tables out of the box like Account, Contact, and Appointment because they support core business functions used by many Power Apps solutions. For this walkthrough, we’ll focus on adding our own table by going to the top menu, selecting Import, and then choosing Import data with Dataflows.
At the top, select Import, then choose Import data with Dataflows. This is where we’ll set up our live connection between Excel and Dataverse. While there are several simple ways to import static data from Excel (for example, by uploading a CSV), Dataflows are what make the connection dynamic.

Great work! Now select Choose Data Source, then pick “Excel workbook.”

At this point, your workbook needs to be stored on OneDrive or SharePoint. Go ahead and sign in with your account, then browse to and select the workbook you want to connect.

Now things should start to look more familiar if you’ve used Power Query before. You’ll first choose which parts of the workbook to connect to. In this case, I’m connecting only to the table I need, currently named “Table1” (I really should have named it better!). Fortunately, we’ll get a chance to give it a clearer name once it’s loaded into Dataverse.

Now we are fully in Power Query, and you can see the label in the upper left corner confirming it. If you wanted to build data transformations, this is where you could do it. For now, I will skip that step and select Next to finalize the Dataflow.

Now we have a few options for how to finalize this connection into Dataverse. I am going to have it create a completely new table.
Here we can name the table, set data types, define a primary key, rename columns, and make other adjustments under the Column mapping dropdown. Each column is assumed to have a single type, just like in Power Query.
For now, I will assume Dataflows and Dataverse handle this setup correctly. If something needs to be changed later, that is fine. This process is reproducible, so we can always go back and update it.

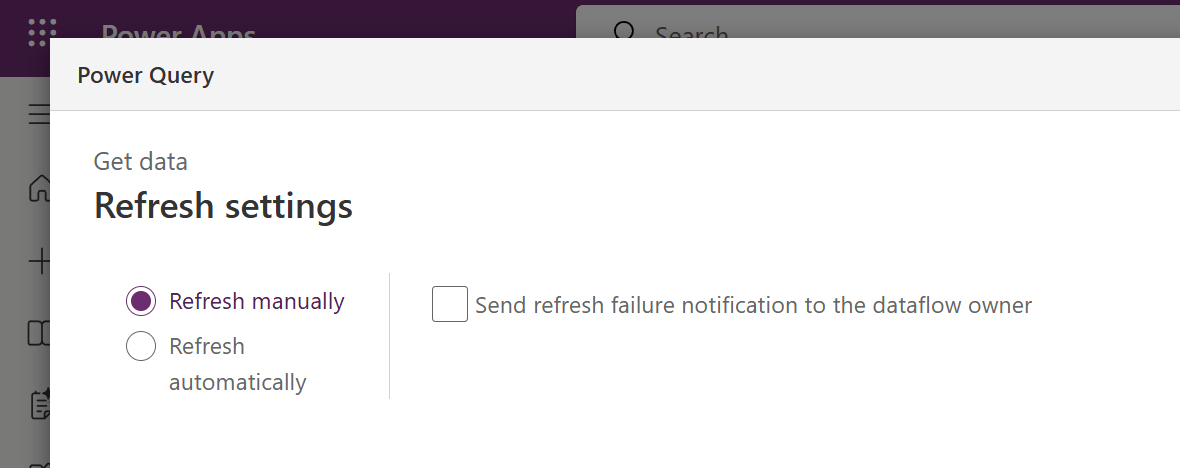
Last, we’ll be asked how we want the Dataflow to refresh. We can set it to run on a schedule or trigger it manually. I am going to set it to refresh manually for now. Since there is a way to trigger a refresh directly within Power Automate, I’ll handle automation later as part of a broader Power Automate flow.
Great work. Now let’s test it with a manual refresh. Go back to your Excel workbook and add a test row. Then return to Power Apps and open Dataflows. You should see your active Dataflow listed, and it may take a moment to finish publishing. From there, select the three dots next to your flow. You can give it a name and choose Refresh to trigger the update.

Amazing. The new record is there. We’ve successfully set up a Dataflow that brings data from an Excel workbook into Dataverse.

Conclusion
In this post, we connected an Excel workbook to a Dataflow in Power Apps and saw how this simple step brings your spreadsheet data into the Power Platform ecosystem. Once the data is stored in Dataverse, it’s no longer limited to one workbook. It can power automations, apps, and even AI-driven summaries across your organization.
In a future post, we’ll build on this foundation by creating a Power Automate flow that pulls your Dataverse data and uses a prompt to generate a dynamic weekly summary. We’ll even have it post directly to Teams for an automated, AI-powered status update, set up an approval process for review and more. Stay tuned!